Microsoft Word is a powerful word processor that most people underutilize primarily because they are not aware of all the features that it offers, or how to find specific features. How does one navigate Microsoft Word?
To view the screen elements for Microsoft Word, simply launch the program by following these steps.
FOR WINDOWS
1) Click the START button
2) Type Microsoft Word and hit the Enter key
3) Once the application launches, double-click the BLANK DOCUMENT icon at the top left of the screen.
FOR MAC
1) Click the LAUNCHPAD icon.
2) Click the Microsoft Word icon, or type Microsoft Word and then click the icon or hit the Enter key.
3) Once the application launches, double-click the BLANK DOCUMENT icon at the top left of the screen.
In order to be productive in any software application, you must first become familiar with the workspace environment. In this article, I will give you a brief overview of the workspace environment of Microsoft Word for Windows.
Exploring the Screen Elements of Microsoft Word
Now that Microsoft Word has launched, you’ll see a blank document, you will see the following screen.

The above screenshot show the default desktop view of Microsoft Word. We are going briefly overview each section of the Microsoft Word page layout. Understand that we are not going to to an exhaustive look at each and every element, (complete books are written on the subject)
Quick Access Toolbar
To begin, you’ll notice that at the very top of your screen, above the main menu, (known as the “Ribbon”), you’ll see a blue bar. This is blue bar is known as the Quick Access Toolbar.

Working from left to right on the Quick Access Toolbar, you’ll notice that you can turn the AutoSave option OFF if you want to, but note that it defaults to the ON position. If you do turn it OFF, you can simply click on the SAVE icon next to the AutoSave, which will immediately save the document for you.
The self-descriptive UNDO and REDO icons are next in line, followed by the Quick Access Toolbar Options drop-down menu. From there, you can choose which icons you would like to display on the Quick Access Toolbar, (see image below).

Before saving the document in question, it will default to the name, “Document1”, as can be see at the center of the Quick Access Toolbar. Once you save and name the document, the title of that document will display in the center of the Quick Access Toolbar.
Moving to the right, you’ll find your name and the picture you have associated with your Microsoft account. Finally, the icon to the right of your picture will allow you to minimize the Ribbon menu that displays below.
25 Basic Computer Tips for Windows!
Windows Simplified for the Everyday User
Download Your Copy Today!Main Menu
Immediately below the Quick Access Toolbar, you will find the Main Menu. Each of these menu items has a drop-down menu associated with them for you to explore.

Microsoft has made each task easily accessible by way of the Main Menu. In effect, any task you could possibly want to accomplish can be accessed from one of the Main Menu items. Note that the SEARCH icon will only search for words within the document in question.
Below the Main Menu, are the elements that make up the “Ribbon Menu”. We will now look at each section of the Ribbon Menu explaining what each section offers.
The Clipboard Section

Moving from left to right, the Clipboard is the first section of the Ribbon Menu. From here you can cut, copy and paste words within your document. Alternatively, you could simply right click anywhere in your document and select cut, copy or paste. You can click the down-arrow located at the bottom right of this section for more options as well.
The Font Section
To the right of the clipboard section, you will find the font section. It is here that you can select the font that you want to use in your document, determine its size, color and everything else related to fonts.

To see even more things that you can do in the Paragraph section, simply click on the down arrow at the bottom right hand side of this section which will open up the following dialog box.

One really great thing about this particular dialog box is that it is here where you can determine the default font, size, etc., for this particular document and all new documents documents you create by simply clicking the SET AS DEFAULT button on the lower left-hand side of this dialogue box, after having made the desired changes. Finally, you can also click the advanced tab at the top of this dialog box for even more options.
The Paragraph Section
The Paragraph section display descriptive icons that show you what you can select to alter the arrangement of text on your document. Here you can list items by bullet point, a numbered list, indent, alphabetize lists, determine the width between lines of text and much more.

To see even more things that you can do in the Paragraph section, simply click on the down arrow at the bottom right hand side of this section which will open up the following dialog box.
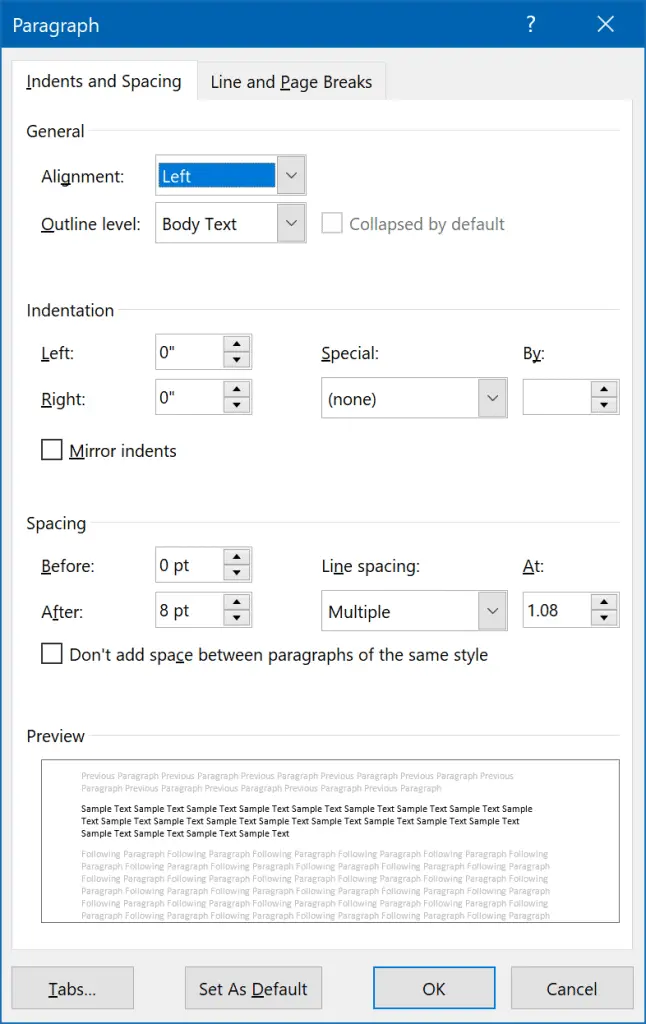
One thing that I like about this, is that this dialogue box offers you a preview of what your document will look like after applying the proposed settings before you actually apply them.
The Styles Section
The Styles section lets you Determine what style will be applied to the entire document. Note that the changes that you apply only pertain to the document that you are currently working on.

To see even more styles, You can Scroll down by navigating with the arrow keys on your keyboard to see additional styles. Alternatively, you can click on the down arrow key at the bottom right hand side of this section, which will cause the styles dialog box to pop out. You can then move that dialogue box anywhere on the screen you like. To apply a style, simply highlight text in your document and click on the style that you would like to use.

The Voice Section

The last section located on the Ribbon, is the Voice option, where you can dictate. After pressing this icon, anything you say, will be translated into written text. It does not need to learn your voice, it just works right out of the box. Simply click the icon and start talking, it’s that easy.
I personally love this dictation feature because it allows my thoughts to flow as I think of them. And though I can type really fast, I can think faster. This one feature is by far my favorite feature of Microsoft Word because I can be so much more productive when creating a document.
The Bottom Toolbar
The last item that I would like to bring to your attention is the toolbar located at the bottom of the screen.

From here, you will know what page you are on in your document and what the word count is. To the right, you can also determine the focused layout and you can increase the font size while creating the document, without actually increasing or decreasing the font size in reality. In other words, The slider located at the bottom right hand side of the screen is for your view. It has absolutely nothing to do with What the document will look like when it is printed or viewed electronically by someone else.
What’s so Special About Microsoft Word?
Word processors have been around for decades, but Microsoft word stands above All other word processors on the market. In fact, Every other word processor on the planet has attempted to overthrow Microsoft Word, however, to date they every one of them has failed to do so, and for good reason.
Microsoft word is arguably the most widely used piece of software on the planet. That’s a bold claim, but if you think about it, it’s true. It could be argued that web browsers are used buy more people than Microsoft Word, and I’ll give you that. But when it comes to productivity, Microsoft Word wins hands-down. Just think about all of the documents in the world, and then ask yourself, what software was used to create this document? Chances are, it was Microsoft Word.
Why Should I Learn Microsoft Word?
There are several reasons why you should make it your mission to learn Microsoft Word.
1) Microsoft Word is THE Industry Standard
If you have any desire to work in any office setting, knowing how to use Microsoft Word is an absolute must. It’s not even debatable. Maybe your job does not require you to work in an office setting and perhaps you are a farmer, or construction worker. Farmers and construction workers use contracts all the time. What are contracts created in? Microsoft Word.
Learning how to use Microsoft Word serves as a kind of gateway entrance to learning other software titles. In other words, if you are able to show yourself productive in Microsoft Word, you will easily be able to take what you have learned and apply your knowledge to other software titles, such as Microsoft Excel or even Microsoft PowerPoint.
2) It’s Easy to Learn
Learning how to use Microsoft Word may seem intimidating at first because of all of the options that you have available to you. Let me encourage you by letting you know that the more you use Microsoft Word, the more proficient you become with it. In no time at all, you will have people coming to you asking how to accomplish certain tasks that are not the norm.
What I love about Microsoft Word is that you don’t have to be a rocket scientist in order to use it. However, rocket scientists do use it. You could simply use it to create a shopping list or write a letter to a friend, or you could use it to write an entire book, complete with a table of contents.
Closing Thoughts
As I have already stated, in order to be productive in any software application, you must first become familiar with the workspace environment. To be frank, the only way that you were going to become productive in using Microsoft Word is to play with it. I would encourage you to open up an already existing document, a letter perhaps, and highlights and text and modified to your hearts delight. If you open up a documented you can use to learn on, you don’t have to worry about messing it up, so have fun! The more you play, the Less intimidating it will become, and the better productive you will become.

Tim Chesonis
Tim has been helping people with computers needs for several years, and he loves to help people succeed. He brings a wealth of wisdom and insight from an entrepreneur's perspective and enjoys freelance writing. In fact, when he's not writing an article, you might find him binge-watching Suits or formatting his computer . . . again, just for fun. To learn more about Tim, click here.25 Basic Computer Tips for Windows!
Windows Simplified for the Everyday User
Download Your Copy Today!