
Occasionally, I will hear someone ask what they should do with their old laptop. Usually I get this question on their way to the store to buy a new one, and I’ll ask them, “Did you know that you can use that laptop as a monitor?”
Though the laptop was never designed to be used as a standalone monitor, it is possible to use your laptop as a second monitor if both the primary computer and the laptop are both running the Windows operating system.
Before you decide to throw that old laptop away, I encourage you to read on, because I’ll show you that your old laptop still may be able to serve you for years to come, just in a different capacity.
What Options Do We Have?
There are numerous YouTube videos that show how people have taken a laptop apart and literally removed the screen completely creating a stand alone monitor out of it. One such video can be found here. Although he clearly knows what is doing I found it extremely geeky and even comical because he defines the stereotype of a computer geek.
We are not going to do that. Not because it won’t work, but because it is way too involved for the average user who just simply wants to use a laptop as an external monitor. There is a better solution and we will get to that in a minute, however, I want to explain why it’s not just as simple as taking a VGA, DVI, or HDMI cable and connecting it from one computer to the laptop.
Most laptops only offer VGA, DVI, or HDMI outputs, meaning the connection will only work from the laptop to an external monitor. It only goes one direction, out from the laptop, not to the laptop. We are looking use a desktop (or laptop), as the primary computer and use a separate laptop as an additional monitor.
If we do not want to purchase a standalone monitor, the only other option outside of completely disassembling a laptop and purchasing hardware to build a standalone monitor out of it, is to use your local network.
Instead of ripping a laptop apart, trying to follow an instructional video on YouTube that would take the better half of other day to accomplish, why don’t we just try using a free piece of software that will utilize your network. This software will allow you to use your laptop as an external monitor to your desktop. Moreover, this can be set up in less than 15 minutes, and within just a minute every time thereafter.
Not to blow your mind, but the software that I am referring to will not only allow you to use your laptop as an external monitor, but your tablet and even cell phone as an external monitor! To top things off, it works on both iOS and Android! The name of this software?
SpaceDesk
SpaceDesk is a product offered by a team of engineers from Datronicsoft. They are engineers who develop high quality Windows device drivers. As a result of over a decade of work, they have developed this FREE piece of software (free for personal use), that will extend or mirror your desktop to a laptop, tablet or cell phone.
Features and System Requirements
Before we move on, let’s talk about the system requirements and how this works. To begin, this will only work on a Windows-based machine. The primary machine must be running either Windows 10, Windows 8.1, or Windows 7.
The secondary machine can run any one of the following operating systems and devices:
- Windows 10
- Windows 8.1
- Windows 7
- Android (version 4.1 or later)
- IOS (version 9.3 or later)
- An HTML 5 web browser (Chrome (>16), Safari (>5.1), Internet Explorer (>10), Opera (>27))
- Windows Phones (Windows Phone 10 / 8.1)
- Windows Surface, tablet, laptop and PC (Windows 10, 8.1, 8, 7, Vista, XP)
- Mac (OSX)
- Linux PC and laptop
You also must be running a Local Area Network (LAN) running TCP/IP v4. The way this works is that the SpaceDesk software on the primary machine is capturing the screen content, and then compresses it, transmitting it over the LAN to the SpaceDesk software on the secondary device.
One really nice feature about this setup is that this software will allow you to either mirror your desktop or extend that desktop to other devices. When in Extend mode, you can drag windows from one screen to another.
25 Basic Computer Tips for Windows!
Windows Simplified for the Everyday User
Download Your Copy Today!How Do I Setup SpaceDesk?
There are two parts to installing SpaceDesk software. We first need to install SpaceDesk on the primary machine. For clarification purposes let’s refer to the primary machine as “The Desktop”. The second part involves installing space desk to the secondary device, and in our case, that would be your Laptop.
SpaceDesk.com has done a thorough job in providing great documentation. They offer written instructions complete with screenshots, on how to install their software on a PC, laptop, tablet, and cell phone (Both iOS and Android). But again, here, I am only going to show you how to install SpaceDesk on your primary machine and on your laptop which is your secondary machine.
For the record, although I am putting the instructions in my own words, (I don’t think English is their native language), for clarification purposes, I am using their screenshots to walk you through the process of creating a primary Desktop and a secondary machine, (the Laptop). Their documentation is much more thorough, showing you how to set up SpaceDesk with every known configuration for all devices supported.
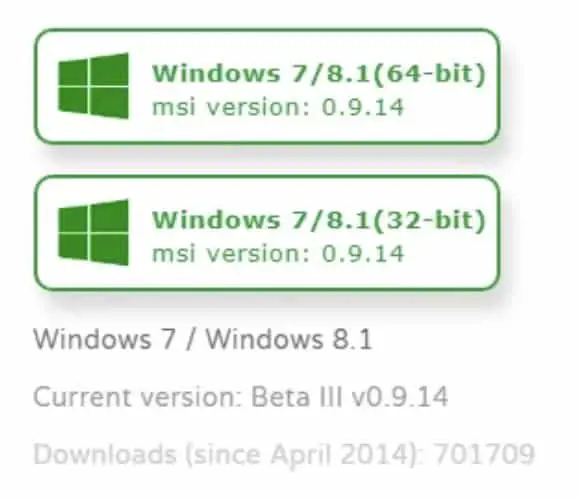
The first thing you will want to do is download the software from SpaceDesk.com and you can do that by CLICKING HERE. You will want to download and install the “SPACEDESK DRIVER SOFTWARE” for the Windows PRIMARY PC (which will serve as the server).
Windows 10 users will need to choose between the 64-bit version and the 32-bit version, (if you don’t know, and are running a fairly new computer, you are almost certainly going to want to use the 64-bit version.

If you are running Windows 7 or Windows 8.1 on your Desktop (Primary machine), you will select the appropriate option on their website, (these screenshots are from their website and are not clickable. You will have to visit their website to download the needed drivers).
When you install the software, install it here:

Be CERTAIN to place a checkbox in the Fire Configuration dialog box to add an exception to the Windows Firewall for SpaceDesk, otherwise it not work.

If installing on a Windows 7 or Windows 8.1 PC, you will be confronted by a dialog box requiring confirmation. Additionally, you will need to reboot the computer at this point, (only if using Windows 7 or Windows 8.1)
Now to verify that it was setup correctly, go to the CONTROL PANEL and click PROGRAMS AND FEATURES to ensure that the software is listed there.
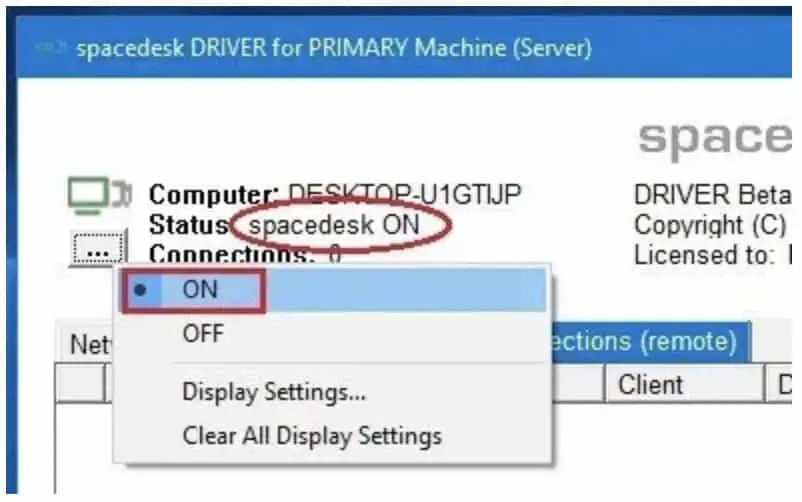
Check to ensure that the SpaceDesk System Tray icon (at the bottom right of the screen) is visible in the notification area.

If you see this icon, click it to ensure that the SpaceDesk status is ON and that the spacedesk Service is running (see below).
To ensure that the spacedeskService is running, click START > [type] COMPUTER MANAGEMENT [hit the ENTER key] > [on the left hand side of this dialog box, click the SERVICES AND APPLICATIONS drop-down menu] > SERVICES, and now on the right hand panel, scroll down until you see spacedeskService to ensure that it is running.

Now we are going to check the Windows Firewall settings to make sure that spacedeskService.exe is allowed on the private or public network. To do this, Open Control Panel > Windows Firewall > Allow an App or Feature through Windows Defender Firewall.
Now you *may* need to click the CHANGE SETTINGS button for the Allow Another App button to display. Once you can click on it, do so and browse to the C:\Windows\System32” folder. Select spacedeskService.exe and click OK. What we have just done is add the spacedeskService.exe as an exception in the Windows Defender Firewall.
It is here that you want to make sure that you have a check in the checkbox next to spacedeskSerivce, and ensure that both check boxes to the right are selected.

The good news is that the hard part is over. Now we are going to set up the secondary machine, and in our case, we are doing to install the SPACEDESK VIEWER SOFTWARE on the Secondary machine, (the laptop). Again, you can download the software from SpaceDesk.com by CLICKING HERE.
As a side note, this very same SPACEDESK VIEWER SOFTWARE not only works for Windows PCs and Laptops, but also for Microsoft Surface Tablets as well.
Once you have downloaded the Viewer software, install it. The installation should look like this on the secondary machine, (the laptop).

Once installation is complete, the Desktop Viewer icon will appear on the desktop of the laptop as shown below.

When you launch the SpaceDesk Viewer icon form the secondary machine, (in this case, from the laptop), it will automatically discover the Primary machine, (in this case, our Desktop).
On the Desktop (Primary Machine), check to see if the connection has been established. On the Desktop (again, Primary Machine), you can do this by clicking the spacedesk System Tray icon (at the bottom right of the screen) to display the spacedesk SERVER user interface.
Now I want you to open Display Control Panel by clicking the little spacedesk system tray icon, and click Display Settings.

This will tell us if there is a secondary display attached (see below).

Finally, we can now determine if we want to Mirror our Primary Desktop, or EXTEND our Primary Desktop. To do this, from the Desktop (Primary Desktop), simply right click on the desktop and click DISPLAY SETTINGS, which will of course, take you to the Display Control Panel.
This is what it will look like if you select the EXTEND DISPLAY SETTINGS option.

If you you decide to MIRROR your Desktop (Primary Machine), select the DUPLICATE THESE DISPLAYS (as shown below).

Conclusion
SpaceDesk is not the only software out there that allows one to extend or mirror your desktop to your laptop, but it sure is a good one. It’s reliable and FREE. I highly encourage you to try it out. If you don’t have a laptop to extend your desktop to, perhaps you may want to extend it to your tablet. Simply go to the App Store, (IOS), or Google Play, (Android), and download the SpaceDesk app to your tablet. All of the documentation on how to do that can be found here.
Related Questions
What Other Applications Are Similar To SpaceDesk?
- Air Display (Avatron)
- AirParrot 2 (Squirrels)
- Duet Display (Kairos)
- iDisplay (Shape GmbH)
- MaxiVista (Bartels Media)
- Twomon USB, TwomonAir (easynlight/DevGuru)
- XDisplay / Wired XDisplay (splashtop)
- ZoneScreen (ZoneOS)
What Can I Do With An Old Laptop?
If you don’t want to recycle it, sell it, or give it away, you may want to consider using it as a media center to play movies or store your music, if not for you, then perhaps for your little kids.

Tim Chesonis
Tim has been helping people with computers needs for several years, and he loves to help people succeed. He brings a wealth of wisdom and insight from an entrepreneur's perspective and enjoys freelance writing. In fact, when he's not writing an article, you might find him binge-watching Suits or formatting his computer . . . again, just for fun. To learn more about Tim, click here.25 Basic Computer Tips for Windows!
Windows Simplified for the Everyday User
Download Your Copy Today!